
My Honest Experience with DIY Lash Extensions: A Step-by-Step Guide
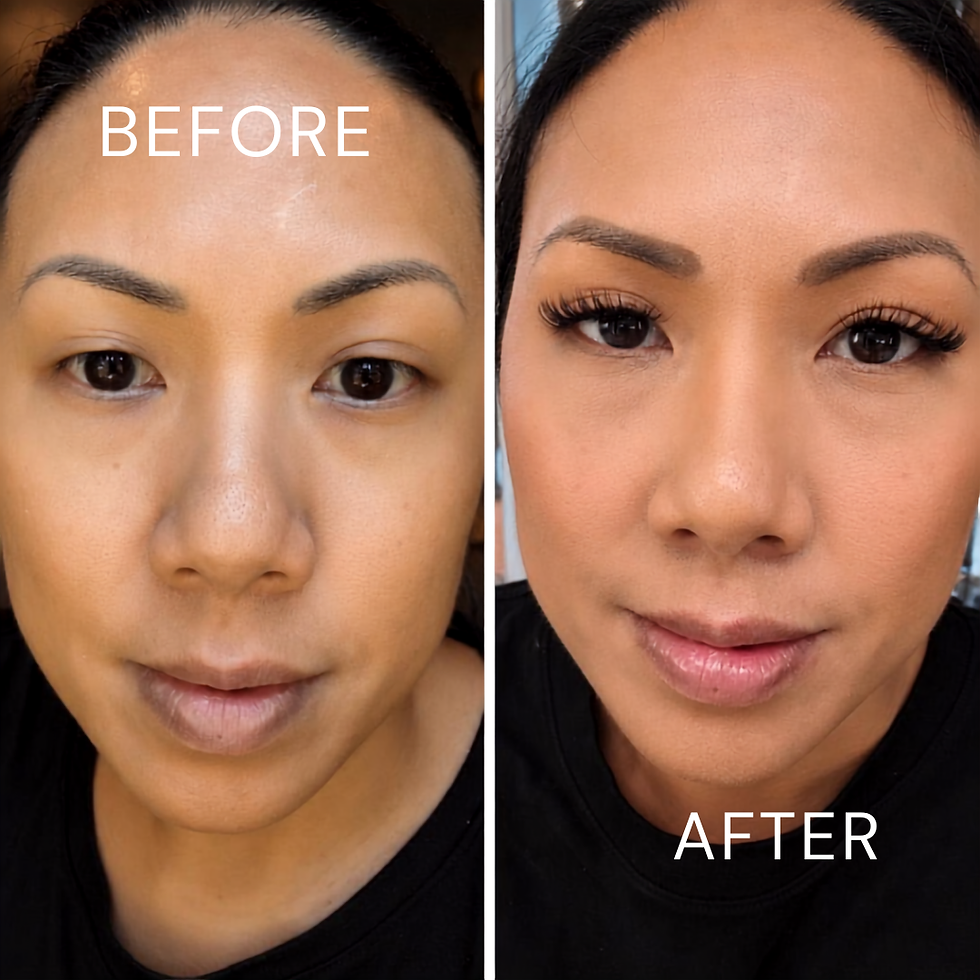
Are you tired of spending money on salon lash extensions? Want to achieve that gorgeous, fluttery look from the comfort of your own home? I recently decided to tackle DIY lash extensions, and I have to say, my experience was surprisingly positive! Here’s a detailed account of my journey along with a step-by-step guide for you to try it out yourself.

My Journey with DIY Lash Extensions
As someone who has always struggled with applying lashes, I was a bit apprehensive about trying DIY lash extensions. However, I was pleasantly surprised by how simple and effective the process turned out to be. With the right tools and a bit of patience, I achieved a beautiful lash look that lasted for days!
Check out my experience here:
What You’ll Need
Before diving into the application, gather the following materials:
Individual lash cluster (I recommend starting with self-stick clusters, choose the length and thickness that suits your style)
Lash Tweezers
Scissors (for trimming lashes)
Q-Tips and Facial Cleanser
Mirror (preferably a magnifying one for precision)

Step-by-Step Guide to Applying DIY Lash Extensions
Step 1: Prepare Your Lashes
Clean your natural lashes thoroughly to remove any makeup or oils. This ensures better adhesion and a longer-lasting look. Use an oil-free cleanser for this step. Then run a q-tip on your upper water line.
Step 2: Choose Your Lash Style
Select the individual lash extensions you want to use. Consider a mix of lengths and curls for a more natural look. For a fuller appearance, opt for a combination of longer lashes on the outer corners and shorter ones towards the inner corners.
Step 3: Apply the Lashes
Pick Up a Lash: Using your tweezers, pick up one individual lash extension from the center of the lash
Attach the Lash: Place the lash extension about 1mm away from your natural lash line. Gently press it onto your natural lash, ensuring it’s secure.
Repeat: Continue this process, working from the outer corner to the inner corner of your eye. Alternate between different lengths for a more natural look.
Press: Press together your natural and false lashes with your fingers or the tweezers to lock them in place.
Step 7: Maintenance Tips
To keep your DIY lash extensions looking fabulous:
Avoid getting them wet, work around them when removing your makeup.
Brush them gently with a spoolie to keep them looking neat.
Conclusion
Overall, my experience with DIY lash extensions was a success! With a little practice and the steps outlined above, you can achieve stunning lash results at home. If you’re interested in learning more about makeup techniques, consider booking a private makeup lesson at www.renelynthomas.com. Let’s elevate your beauty game together!
For more beauty tips and tricks, be sure to visit www.renelynthomas.com!


Comments